The Gentle Art of Compositing
Clive R. Haynes FRPS
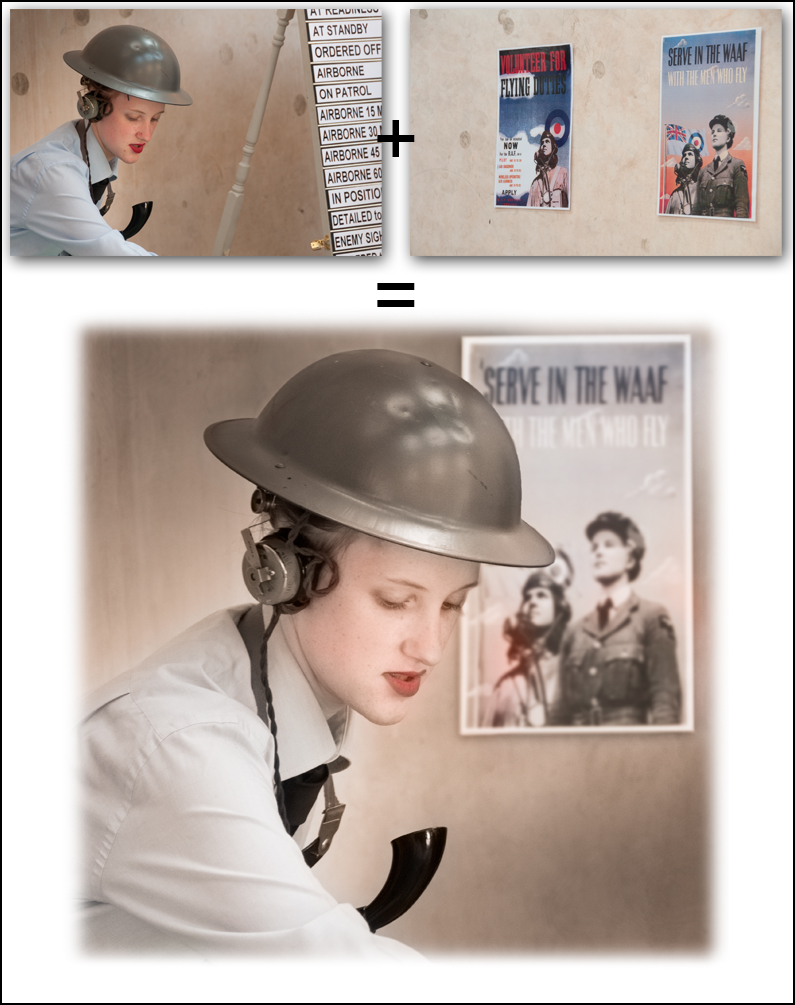
Almost since the dawn of photography, photographers have sought to combine images together. The combinations can be for aesthetic purposes, for reasons of practicality or to produce a 'vision' that exists in only the imagination of the artist.
Digital imaging affords yet more scope for the photographer/artist.
Generally speaking, the more subtle the combination the more pleasing the result, however, some crude cut & paste amalgamations can have a primitive delight all of their own. It all depends upon what you wish to achieve and communicate.
There are many considerations to be made before one begins to combine images and here are some thoughts.
The relative scale of the individual component image
The textural integrity of each component image
The direction of lighting for each component image
The direction and possible addition of shadows
The colour tone of each component image
The 'sincerity' of the overall picture
Most of the problems are best resolved at the 'taking stage' by the art of 'previsualisation' - that is to say wherever possible be aware of the final picture you have in mind as you photograph and 'assemble' the various components for the image.
Taking the above topics one at a time, below are thoughts and practical advice.
Scale of the individual images
If you are unable to photograph the images for your composite picture individually at the correct scale for the final result then you will have to alter their relative size in some way. Commonly, people simply re-size the components via the Edit > Transform > Scale route. A small amount of re-sizing is generally acceptable, however this method is not always the best answer, as pixels are either invented or discarded in the process. The final image can suffer a 'definition differential' i.e. some parts being either sharper or fuzzier than others - see 'Textural Integrity' below.
It’s possible to overcome this problem to some extent by wherever possible ensuring the individual images for the intended composite picture as close to the scale required as possible.
Textural Integrity
There are two principal areas, ‘Noise’ and ‘Sharpness’.
‘Noise’
When combining images it’s considered 'bad practice' to combine a fine, virtually ‘noiseless’, low ISO (little or no ‘grain’) image with a ‘noisy’, high ISO (course ‘grain’) image in the same scene - well, if it’s discernible that is. The problem is becoming much less evident as cameras become less and less ‘noisy’ at higher ISO settings.
Imagine a finely delineated landscape to which a dramatic sky has been added. An example would be where the sky originated from a high ISO setting whilst the landscape was taken at a low ISO value. The evident granular quality of the sky would not sit easily with the image. There would be a lack of 'textural integrity' and the image would be uncomfortable.
Should you be faced with the problem of a too obviously ‘noiseless’ area in an image where the noise should be visible to give some veracity, add some 'Noise' via, Filter > Noise > Add Noise, however do this on a separate layer. A better and more flexible method is to make a new (empty Layer) above the problem Layer, fill this with 50% Grey (In Photoshop via Edit > Fill > 50% Grey > OK). Everything will go grey! Next, change the Blend Mode for this Layer from ‘Normal’ (top LH of Layer Palette) to ‘Overlay’ (image returns). Next: Go to Fill > Noise > Add Noise. Adjust the amount to integrate with the image. You can alter the opacity of the Layer and add a Layer Mask to refine the area.
Sharpness
Make certain that the components of the image appear to be part of an original scene both in terms of texture and sharpness. Avoid images that look too sharp for their surroundings, and if necessary use softening or blurring to subtly reduce sharpness.
Direction of Lighting
As fundamental as it may appear, many multi-image pictures are ruined by poor attention to lighting and shadow details.
Indoors or under artificial lighting where there are multiple light-sources you may get away with it but outdoors in daylight, where we expect there to be just the one light source i.e. the sun, two or more shadow angles will bring the image into question.
Don't forget the direction of the ‘key light’, as the highlight-side of the area you're working on may also need attention to render the image convincing.
Problems with lighting direction can sometimes be easily overcome by flipping the image horizontally via Edit > Transform > Flip Horizontal. However ‘flipping’ also reverses any writing, rings on fingers (watch-out Wedding Photographers!), breast-pocket handkerchiefs, watches, etc., etc.
If it's really difficult to change things without it looking obvious - and Photoshop can't help with everything – and if you’re in any doubt- don't risk it – someone will notice the error, so choose something else or shoot the required item again.
Shadows
Sometimes the original shadow will need to be stripped away (possibly by using a Layer Mask) and a fresh shadow added either via Layer > Effects > Drop Shadow with further adjustments via the 'Transform' options, or by carefully painting one in. The simple alternative method of ‘painting in can work very well. Add a new, empty Layer above the subject and use a soft-edge brush tool at the required size to gently paint in the shadow. This is easier for a general dark shadow on a bright or overcast day but much more demanding under harsh light. A Layer Mask can be added to the ‘Shadow Layer’ to carefully edit the work.
Colour Tone
This is a similar problem area to lighting. If you're bringing in different images, shot at different times, different cameras, different setting, indoor/outdoor etc, then it's inevitable that you'll have to make some adjustments to these individual components of the picture. If possible make these adjustments at the RAW editing stage either in Lightroom or Adobe Camera RAW.
If you have to work on post RAW images or jpegs then make these adjustments with an Adjustment Layer for each image concerned. You’ll need to make a ‘Clipping Group’ for each new image layer.
Use one of the following to make these changes and it can be tricky, all via Image > Adjust >
Hue/Saturation
Color Balance
Selective Color
Channel mixer
Sincerity
This is probably the most difficult item to discuss, as Photoshop certainly has no such function in its program.
Sincerity is about what you are making with your image and what you intend. Whilst it's true to say that in art there are really no 'rules', only 'conventions', think seriously about what you are doing - stand back for a moment and consider. Is the effect you're striving to achieve rooted in some form of reality? Will it confuse or intrigue the viewer? Is the overall effect merely an effect for its own sake? - in the "I can do it, so I will - aren’t I a clever person!" school of art. Yes, we've all done it, we've all been there and we've all seen images of strange and distorted faces and wings fitted to things and the like.
Think to yourself:
When I've completed this picture, will it add up?
Will it tell us more about the object/scene/emotion/person portrayed or extend our knowledge in some way?
Will it be amusing and intriguing or simply weird and confusing?
Will it be true to its own internal logic?
When entering the realm you’ve created, will viewers willingly suspend their disbelief?
Sincerity is a vast issue and there are no black and white answers, only shades of grey.
The important thing is not to get carried away with an idea or series of effects for their own sake. Try to remain faithful to your internal vision and not to be side-tracked by the weird and wonderful things you can superimpose on a scene.
The most telling pieces of work are those with a simple and direct message, delivered in an uncluttered way.
The very problem with making the statements above is that many examples can be found that appear to contradict them. At least I hope I've made you stop and consider.
Finally, when you’ve completed your masterpiece, leave it for a while then return to it. If when you view it your conclusion is: ‘that’ll do’ – it most certainly won’t. Be critical, others will be less forgiving. Remember what you’re aiming for can be summed up in just seven words, ‘Fidelity of representation with insistence upon detail’. Exercise ‘quality control’ at all stages.
For more information about Layer Masks, Adjustment Layers, Adding and Managing Shadows,